How to configure Office Web Apps Server for use with Exchange 2013
Get the steps necessary to build an Office Web Apps Server farm and integrate it with Exchange 2013. It's essential if you add other Wave 15 products.

Office Web Apps Server represents a way for users to access Web-browser-based versions of Word, Excel, PowerPoint and OneNote within OWA. This tip discusses why it's important, requirements for implementation and also details how to build a small Office Web Apps infrastructure and integrate it with Exchange Server 2013.
An introduction to Office Web Apps Server
Since Exchange Server 2007, users have had the ability to view Office documents from within OWA without needing to download the attachment or requiring a local copy of Office installed on the PC.
In Exchange 2007 and Exchange 2010 this was accomplished via WebReady document viewing, which provided conversion of documents to image format using, in part, a technology called "Oracle Outside In." This Oracle-licensed technology hasn't been without issues; for example, the MS12-058 security vulnerability was exposed earlier in 2012. Also, when compared with Microsoft's own Office Web Apps, it simply looks dated.
Therefore, it's quite logical that with Exchange 2013 release, WebReady document viewing isn't just deprecated, it's completely removed.
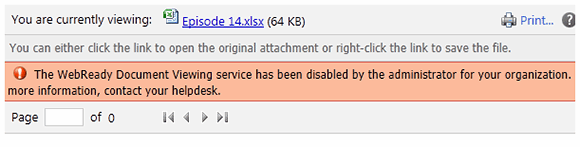
After a full Exchange 2013 install, users can still preview attachments, but when they do, they will receive an error message (Figure 1).
Obviously this is not the most helpful error message. It gives the impression that there's a way to enable WebReady document viewing. As I stated before, you cannot. Exchange 2013 is actually complaining about the fact that it cannot access a server running Office Web Apps Server 2013 in order to render the document.
If you want to give users the option to preview documents in Outlook Web App, you must install Office Web Apps Server. Unfortunately, that comes with a caveat. You cannot install Office Web Apps Server alongside Exchange 2013; you must install it on at least one standalone server and configure a farm.
If you're not familiar with Office Web Apps Server, it's time to learn a little more about it.
Office Web Apps Server lets users view and (if licensed) edit Office documents. In previous version, it was really only used within SharePoint to allow users to edit documents within SharePoint libraries via a Web browser.
Office Web Apps Server is used across the three main server products in Wave 15: Lync 2013, SharePoint 2013 and, of course, Exchange 2013. When you consider using it just with Exchange, it seems a bit arduous to install at least one server just to render previews of attachments. But when you take into account that it's a requirement for rendering presentations within Lync 2013 conference calls, and really useful within SharePoint 2013, it makes a lot of sense.
SharePoint 2013, Lync 2013 and Exchange 2013 work very well together, so it makes sense to use the same technology and a single, shared pool of resources to render Office documents across your organization.
Now that you've got a baseline understanding of the technology, let's look at what's necessary to implement Office Web Apps Server. You'll see it's not terribly difficult, and if you're already implementing Exchange 2013, the addition of an Office Web Apps Server will prove very useful if you're considering the rest of the new product suite.
Office Web Apps Server prep work
Before beginning the Office Web Apps Server install, it's important make sure you're properly prepared. As with any new deployment, a little bit of time and some understanding of what you're trying to achieve -- as well as determining your topology -- will help you avoid issues later on.
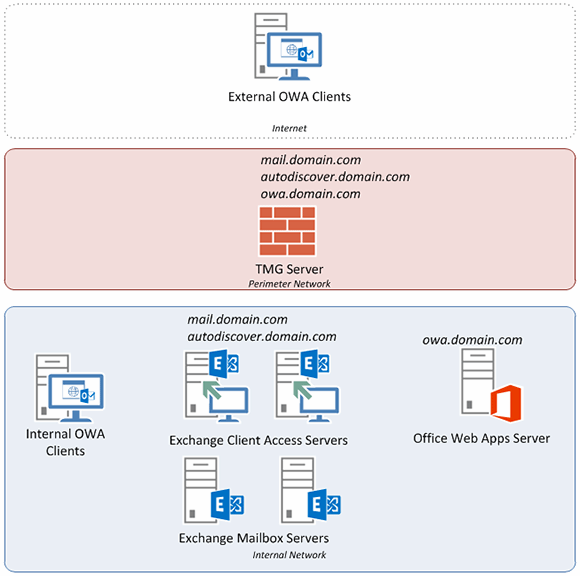
In the example organization I'll reference in this tip, we have an Exchange Server 2013 deployment, which is configured to use the same URLs internally and externally using split DNS. In our example, we want to publish to the outside world using Forefront Threat Management Gateway (TMG) 2010 because it lets you use a single external IP address for both Exchange 2013 and Office Web Apps Server (Figure 2).
In order to support Office Web Apps Server, we must ensure that we've got a suitable name on our Subject Alternative Name (SAN) certificate. This allows us to use the same certificate on TMG, our Exchange 2013 client access servers and on the Office Web Apps Server itself, saving on cost and external IP addresses.
Note: This approach is not a requirement, and your organization may find a different approach more appropriate.
We currently have the following names on our SAN certificate to support Exchange 2013:
- mail.domain.com
- autodiscover.domain.com
To support Office Web Apps Server, you must choose a suitable DNS name. The name itself isn't especially important, but if you want the option to add additional Office Web Apps Servers to a farm as required, you should pick a service name rather than the server name itself. For example, you could choose officewebapps or even owa. For the sake of this tip, let's select owa.
This is how our SAN looks now:
- mail.domain.com
- autodiscover.domain.com
- owa.domain.com
Internally, we'll assign the DNS entry for owa to our single, standalone Office Web Apps Server. Externally, we'll configure the DNS entry to resolve to the same IP address that Exchange 2013 names resolve to, which in this case is an external IP address on our Forefront TMG server.
The base requirements for Office Web Apps Server are the same as SharePoint 2013, and are detailed in the Hardware and Software Requirements for SharePoint 2013 document on TechNet. A quick rundown details a minimum of 8 GB RAM, 4 CPU cores and 80 GB of system hard-disk space.
You have the option to use Windows Server 2008 R2 SP1 or Windows Server 2012 as the base operating system for Office Web Apps Server. For simplicity of install and future lifespan, let's go with Windows Server 2012, and install it in a virtual environment. Doing so will save on Windows Server licenses and additional hardware.
Installing Office Web Apps Server 2013
With our DNS entries configured and SSL certificate and base Windows server ready, we can begin installing Office Web Apps Server onto the first server that will form the base of the farm.
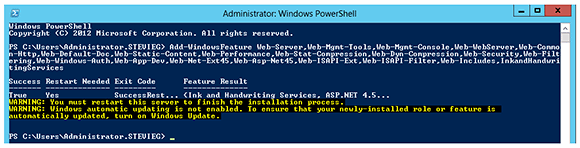
The first task is to install the Windows Server roles and features required to support Office Web App Server. The easiest way to accomplish this is via a PowerShell prompt (Figure 3), using the following command:
Add-WindowsFeature Web-Server,Web-Mgmt-Tools,Web-Mgmt-Console,Web-WebServer,Web-Common-Http,Web-Default-Doc,Web-Static-Content,Web-Performance,Web-Stat-Compression,Web-Dyn-Compression,Web-Security,Web-Filtering,Web-Windows-Auth,Web-App-Dev,Web-Net-Ext45,Web-Asp-Net45,Web-ISAPI-Ext,Web-ISAPI-Filter,Web-Includes,InkandHandwritingServices
After a simple install and reboot, you're ready to obtain and install the core software. Office Web Apps Server 2013 can be downloaded from the Microsoft Download site.
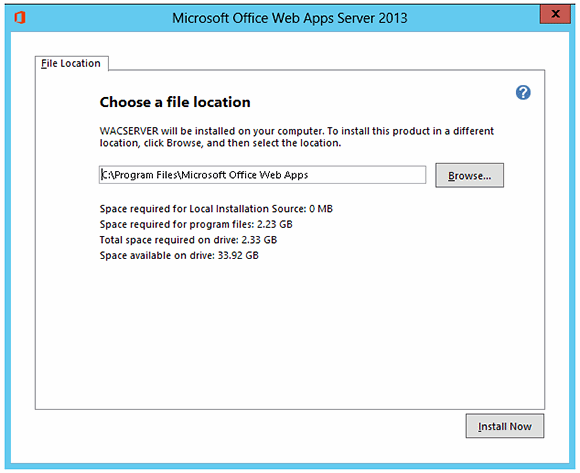
After mounting the downloaded ISO file (simply double-click wacsserver.img on Windows Server 2012) you can proceed through the basic Office Web Apps Server install. Since the actual configuration is accomplished post-install using PowerShell, the main decision is determining where to install the product itself (Figure 4).
After a successful installation, you must install the SSL SAN certificate using an exported PFX file from the Exchange 2013 server. This can be accomplished several ways, but the easiest is to use the Certificates MMC snap-in.
To access the snap-in, use the following procedure:
- Launch mmc.exe.
- Navigate to File ->Add/Remove Snap-In.
- From Available Snap-ins, select Certificates, then click Add.
- When prompted, select This snap-in will always manage certificates for: Computer Account. Leave the Local Computer default selected.
- Import the certificate by expanding Certificates (Local Computer) -> Personal, then right-click and select All Tasks -> Import Certificate.
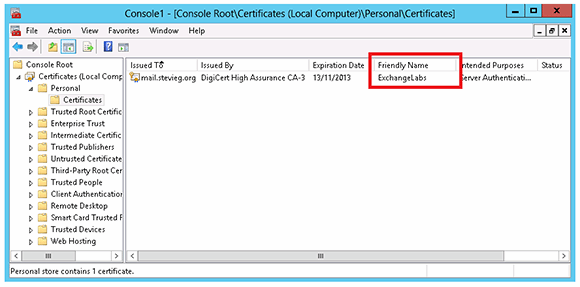
After importing the certificate, you'll see it listed within the Personal Certificates store. Make note of the certificate's Friendly Name (Figure 5).
Now that Office Web Apps Server and the certificate are both correctly installed, the next step is to create a new farm. Open a PowerShell prompt and enter the New-OfficeWebAppsFarm cmdlet, specifying the InternalURL, ExternalURL and CertificateName parameters:
New-OfficeWebAppsFarm -InternalURL https://owa.domain.com -ExternalURL https://owa.domain.com -CertificateName FriendlyName

Now navigate to the Office Web Apps discovery URL. In our example, it is https://owa.domain.com/hosting/Discovery. If all is well, you should see an XML output similar to the one shown in Figure 6.
Integrating and testing Office Web Apps Server with Exchange 2013
Now that Office Web Apps Server is set up and working internally, you should be able to configure Exchange 2013 and see the results of your labor.
To start, open theExchange Management Shell on one of your Exchange 2013 servers. Doing so is necessary to make a couple of changes at the organization level. It ensures that Exchange knows where Office Web Apps are located.
You should also make a change at the Outlook Web App virtual-directory level to ensure that Office-Web-Apps previews are enabled across all virtual directories. Use the following code:
Set-OrganizationConfig -WACDiscoveryEndpoint https://owa.domain.com/hosting/Discovery
Get-OwaVirtualDirectory | Set-OwaVirtualDirectory -WacViewingOnPublicComputersEnabled:$true -WacViewingOnPrivateComputersEnabled:$true
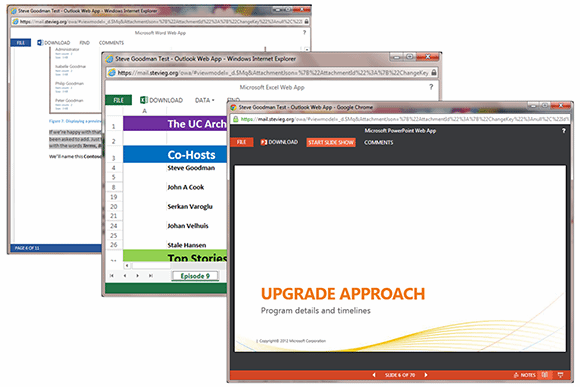
You now have the option to either wait approximately 15 minutes, or run the iisreset /noforce command against the relevant Exchange server that you'd like to preview an Office format attachment in Outlook Web App (Figure 7) on.
Note: Remember, Outlook Web App runs on the mailbox server role in Exchange 2013.
Office Web Apps is much more than just a viewer. You can navigate the document with near-full fidelity, copy and paste text from the document, translate the document to another language in-browser or for PowerPoint documents, and start a full-screen slideshow.
Publishing to external users
The final step is to publish the Office Web Apps Server to your Outlook Web App users.
Depending on your organization's current infrastructure, you might have a number of options available, such as:
- Using a reverse-proxy like Forefront TMG 2010;
- Using a hardware load balancer; or
- Using your firewall to publish the server using network address translation (NAT) rules.
Considering that many Exchange organizations still use Forefront TMG, let's look at the generic approach.
You must use the following:
- Your single external IP address and SAN certificate;
- A new Web farm that lets you easily add and remove Office Web App servers. You should also have the ability to perform load balancing and protocol level checks;
- A new Web publishing rule for your internal and external name (owa.domain.com) with HTTP options for verifying normalization. Blocking high-bit characters should also be switched off.
Now let's quickly run through the steps to set this up. First, create the new rule and Web farm using the New Web Publishing Rule wizard.
1. Choose an appropriate name for the rule, like Office Web Apps.
2. On the Publishing Type page, select Publish a server farm of load balanced web servers.
3. Enter the Office Web Apps server name (owa.domain.com) as the Internal Site Name.
4. On the Internal Publishing Rule Wizard page, enter /* under Path to publish the entire Office Web Apps Server website.
You will then be prompted to create a New Server Farm. Follow these steps:
1. Enter an appropriate name for the farm, like Office Web Apps Farm.
2. Add the initial Office Web Apps Server using its name or IP address.
3. Edit the Advanced Farm Connectivity Verification field to use https://*/hosting/Discovery for the connectivity verification URL and specify the external DNS name (owa.domain.com) as the Host Header.
You'll now return to the Web Publishing Rule wizard, where you will:
1. Enter the external DNS name under Public Name, using the /* path.
2. Choose the existing Exchange listener.
3. Select No delegation and client cannot authenticate directly underneath Authentication Delegation.
4. Select the same options you used for your Exchange publishing rules under User Sets. If you're not using single sign-on for the listener, you might need to choose All Users to avoid end-user prompts for authentication.
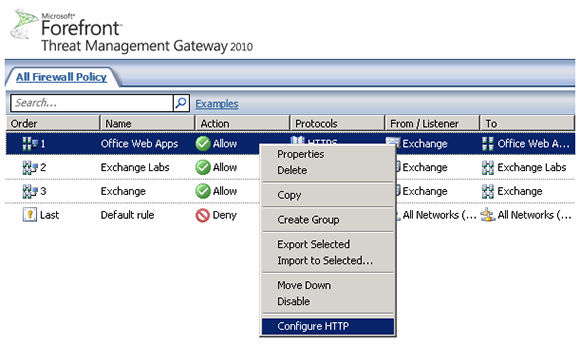
After completing the wizard, you'll see the new rule. There's one final thing to do, however, which is to configure the HTTP options for the rule. To do so, right-click the new rule and select Configure HTTP (Figure 8).
You will now see the Configure HTTP policy for rule dialog box. Within the URL Protection section, deselect the following options:
- Verify normalization
- Block high-bit characters
After double-checking the TMG rule, you are ready to apply the changes to TMG and test Office-Web-Apps-based document preview externally.
Final thoughts
As you can see, configuring Office Web Apps to work with Exchange 2013 is somewhat simple once you get all the new hardware requirements ironed out.
The end result is a much more modern document viewing experience for end users and is consistent across Office 2013 server products, making for an improved user experience. If you're considering an Exchange 2013 deployment, the addition of an Office Web Apps Server farm is recommended. If you're also looking to implement Lync and SharePoint 2013, it's near essential.
About the author
Steve Goodman is an Exchange MVP and works as a technical architect for one of the UK's leading Microsoft Gold partners, Phoenix IT Group. Goodman has worked in the IT industry for 14 years and has worked extensively with Microsoft Exchange since version 5.5.